
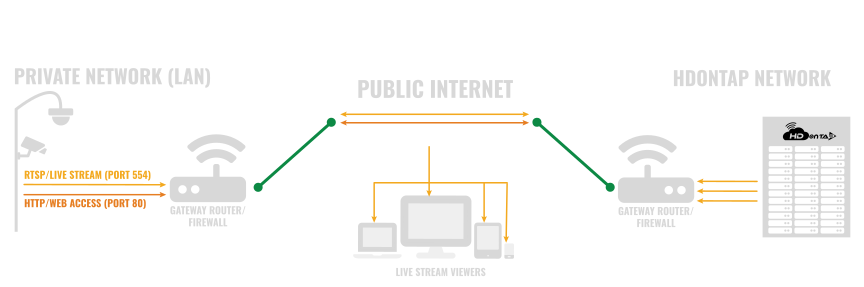
In order to set up your camera with the HDOnTap network, the following information and access are required: public IP address of your router/network, public or WAN (wide area network) port mapped to port 80 of the camera (for HTTP access to the camera’s web interface), public or WAN port mapped to port 554 of the camera (for RTSP (Real-Time Streaming Protocol) access to pull the live stream), and a username and password with administrative access to your camera.
Before we get started, a webcam for the purposes of live streaming with HDOnTap is simply a network camera or a camera that connects to a network with an IP address. To avoid confusion, the terms webcam, IP camera, network camera and camera all mean the same thing. HDOnTap’s network reaches out over the public internet and pulls the live stream from your camera.
Download: Setting Up Your Network for Live Streaming (PDF)
Want a printable guide? Our Setting Up Your Network for Live Streaming guide covers your public IP address, mapping your public WAN (wide area network) ports to ports 80 (HTTP) and 554 (RTSP, Real Time Streaming Protocol) on your camera, the admin login, testing and troubleshooting, plus options if you can't open ports.
Download Setting Up Your Network for Live Streaming (PDF, 482 KB)
Step-by-step instructions
-
Find the Public IP Address of Your Router/Network
Every network connected to the internet has a unique public IP address. This allows devices on the internet (for example, within HDOnTap’s network) to find your network, camera and devices. There are two types of IP addresses:
- Static Public IP Address: A static public IP address is static (does not change) and is preferred (but not required).
- Dynamic IP Address: Dynamic IP addresses will change from time to time for many different reasons (for example, rebooting the router, power outages or ISP (internet service provider) policies). As the HDOnTap network must know the active IP address in order to reach your device, dynamic IP addresses will require manual updating within the HDOnTap Portal any time there is a change unless your router supports dynamic DNS (Domain Name System). If your site doesn't have a static public IP address, HDOnTap staff can set up dynamic DNS for you. See Dynamic DNS for Camera Sites.
To find your public IP address, use a computer or device on your network to visit the HDOnTap IP Address Tool.
IPv4 or IPv6? There are two kinds of IP addresses, and some ISPs hand out IPv6 addresses. Here's how to tell them apart:
- IPv4 (Internet Protocol version 4): four numbers from 0 to 255, separated by dots. Example: 203.0.113.25
- IPv6 (Internet Protocol version 6): longer, with groups of hexadecimal digits (0–9 and a–f) separated by colons. Example: 2001:db8:85a3::8a2e:370:7334
HDOnTap needs a public IPv4 address. If the HDOnTap IP Address Tool shows an IPv6 address, contact your ISP and ask for a public IPv4 address. If you can't get one, see No open ports or no public IP address? below.
Example addresses are from the ranges reserved for documentation.
-
Map the Public WAN Port to Port 80 (HTTP) and Port 554 (RTSP) of the Camera
Most IP cameras use port 80 for HTTP/web access and port 554 for RTSP/streaming access, meaning we require access to both of these ports to configure the camera settings and pull a live stream. If your camera is connected to your network with a private IP address, there are two methods to allow access to ports 80 and 554 via your router:
-
Port Forwarding: For the most secure setup, we recommend using WAN ports other than 80 and 554, and typically suggest using ports 11080 and 11554, respectively. Any unused WAN ports will work, but avoid 10080, because some browsers, including Google Chrome, block it. Map these ports to ports 80 and 554 of your camera’s LAN/private IP address. See our Port Forwarding Guide for more information.
Example with two cameras:
Public (WAN) port Forwards to 11080 Camera 1 LAN IP, port 80 11554 Camera 1 LAN IP, port 554 11081 Camera 2 LAN IP, port 80 11555 Camera 2 LAN IP, port 554 -
DMZ (Demilitarized Zone): While port forwarding redirects requests to a different port, DMZ forwards all incoming requests directly to your camera’s LAN/private IP address, not just the ports you choose. While this is not the most favorable method, it may be required if your router doesn’t support port forwarding. With DMZ, only one device, so only one camera, can be reached from the internet.
No open ports or no public IP address?
If you can't open ports, or your internet connection doesn't give you a public IPv4 address, there are two other ways to stream with HDOnTap:
- HDOnTap VPN (virtual private network) service: connects your site to HDOnTap over a WireGuard VPN, with port forwarding over the VPN to reach the cameras on your LAN (local area network). That makes remote access possible on connections like Starlink residential, which don't give you a public IPv4 address to forward. Contact us for a quote.
- Push streaming: if your camera supports it, it sends the stream to HDOnTap over RTMP (Real-Time Messaging Protocol), RTMPS (RTMP over a secure TLS connection) or SRT (Secure Reliable Transport). Push streaming needs no open ports.
We still prefer opening access when you can, so we can control the camera remotely.
-
Camera Username and Password
Security tip: Before you open any ports, change your camera's default password to a strong one. Opening ports makes your camera's login page reachable from the internet.
We require administrative access to your camera to optimize the stream settings. For security purposes, we recommend creating a new administrative account specifically for HDOnTap; however, we can use any username/password as long as it has administrative privileges.
-
Test Public Access Setup
Now that you have acquired your public IP address, ensured access to ports 80 and 554 and generated a username and password with administrative privileges, we recommend running a test to ensure everything is accurate and functional.
Testing with a Smartphone
- Turn off WiFi access on your phone so that it is using the cellular network for internet access.
- Open your web browser and navigate to: http://[YOUR NETWORK’S PUBLIC IP ADDRESS]:[PUBLIC HTTP PORT]
- If you see the login page for your camera, your setup is correct and ready for HDOnTap!
Testing with a Computer
- Use a computer connected to the internet outside of your network (not on your Wi-Fi or LAN).
- Open your web browser and go to http://[YOUR NETWORK’S PUBLIC IP ADDRESS]:[PUBLIC HTTP PORT]. For example, if your public IP address were 203.0.113.10, you would go to http://203.0.113.10:11080.
- If you see the login page for your camera, your setup is ready for HDOnTap!
Troubleshooting
- Make sure the camera is powered on.
- Verify you are able to access the camera from a device on the same network by using the camera’s private/LAN IP address.
- Verify you are able to access the internet from a computer on the network.
- Verify that the camera’s network settings have a gateway/router IP address that matches the IP address you use to access the router from your network.
- Verify you are using the correct public IP address, which can be verified by using a computer or device on your network to visit the HDOnTap IP Address Tool.
If you are still unable to access your camera after following these troubleshooting steps, please contact us during business hours at 858.481.4096, Option 2, or email [email protected]. If our team needs to see your screen to help, we may ask you to set up a remote support session with Chrome Remote Desktop. See How to Set Up Chrome Remote Desktop for HDOnTap Support.
Still need help?
Contact the HDOnTap support team at [email protected] or submit a support request.